WhatsApp Widget Setup
The WhatsApp Widget allows our client's website visitors to start a conversation with our client's team directly via WhatsApp. This tutorial covers how to connect their channel, customize the widget's appearance, and embed it on our client's website.
Prerequisites
Before setting up the widget, ensure the client has:
- An active WhatsApp Business account.
- Access to their website's source code or CMS (e.g., Webflow, Next.js).
Step 1: Connect the WhatsApp Channel
To use the widget, the client must first connect their WhatsApp number through Meta Business.
- Navigate to Account Settings and select the Channel Management tab.
- Click Connect Now in the Meta Business Connection section.
- Follow the Meta authentication flow to link the account.
- Once linked, their WhatsApp numbers will appear under Managed Account Channels.
- Activate the number they wish to use by clicking the toggle switch.
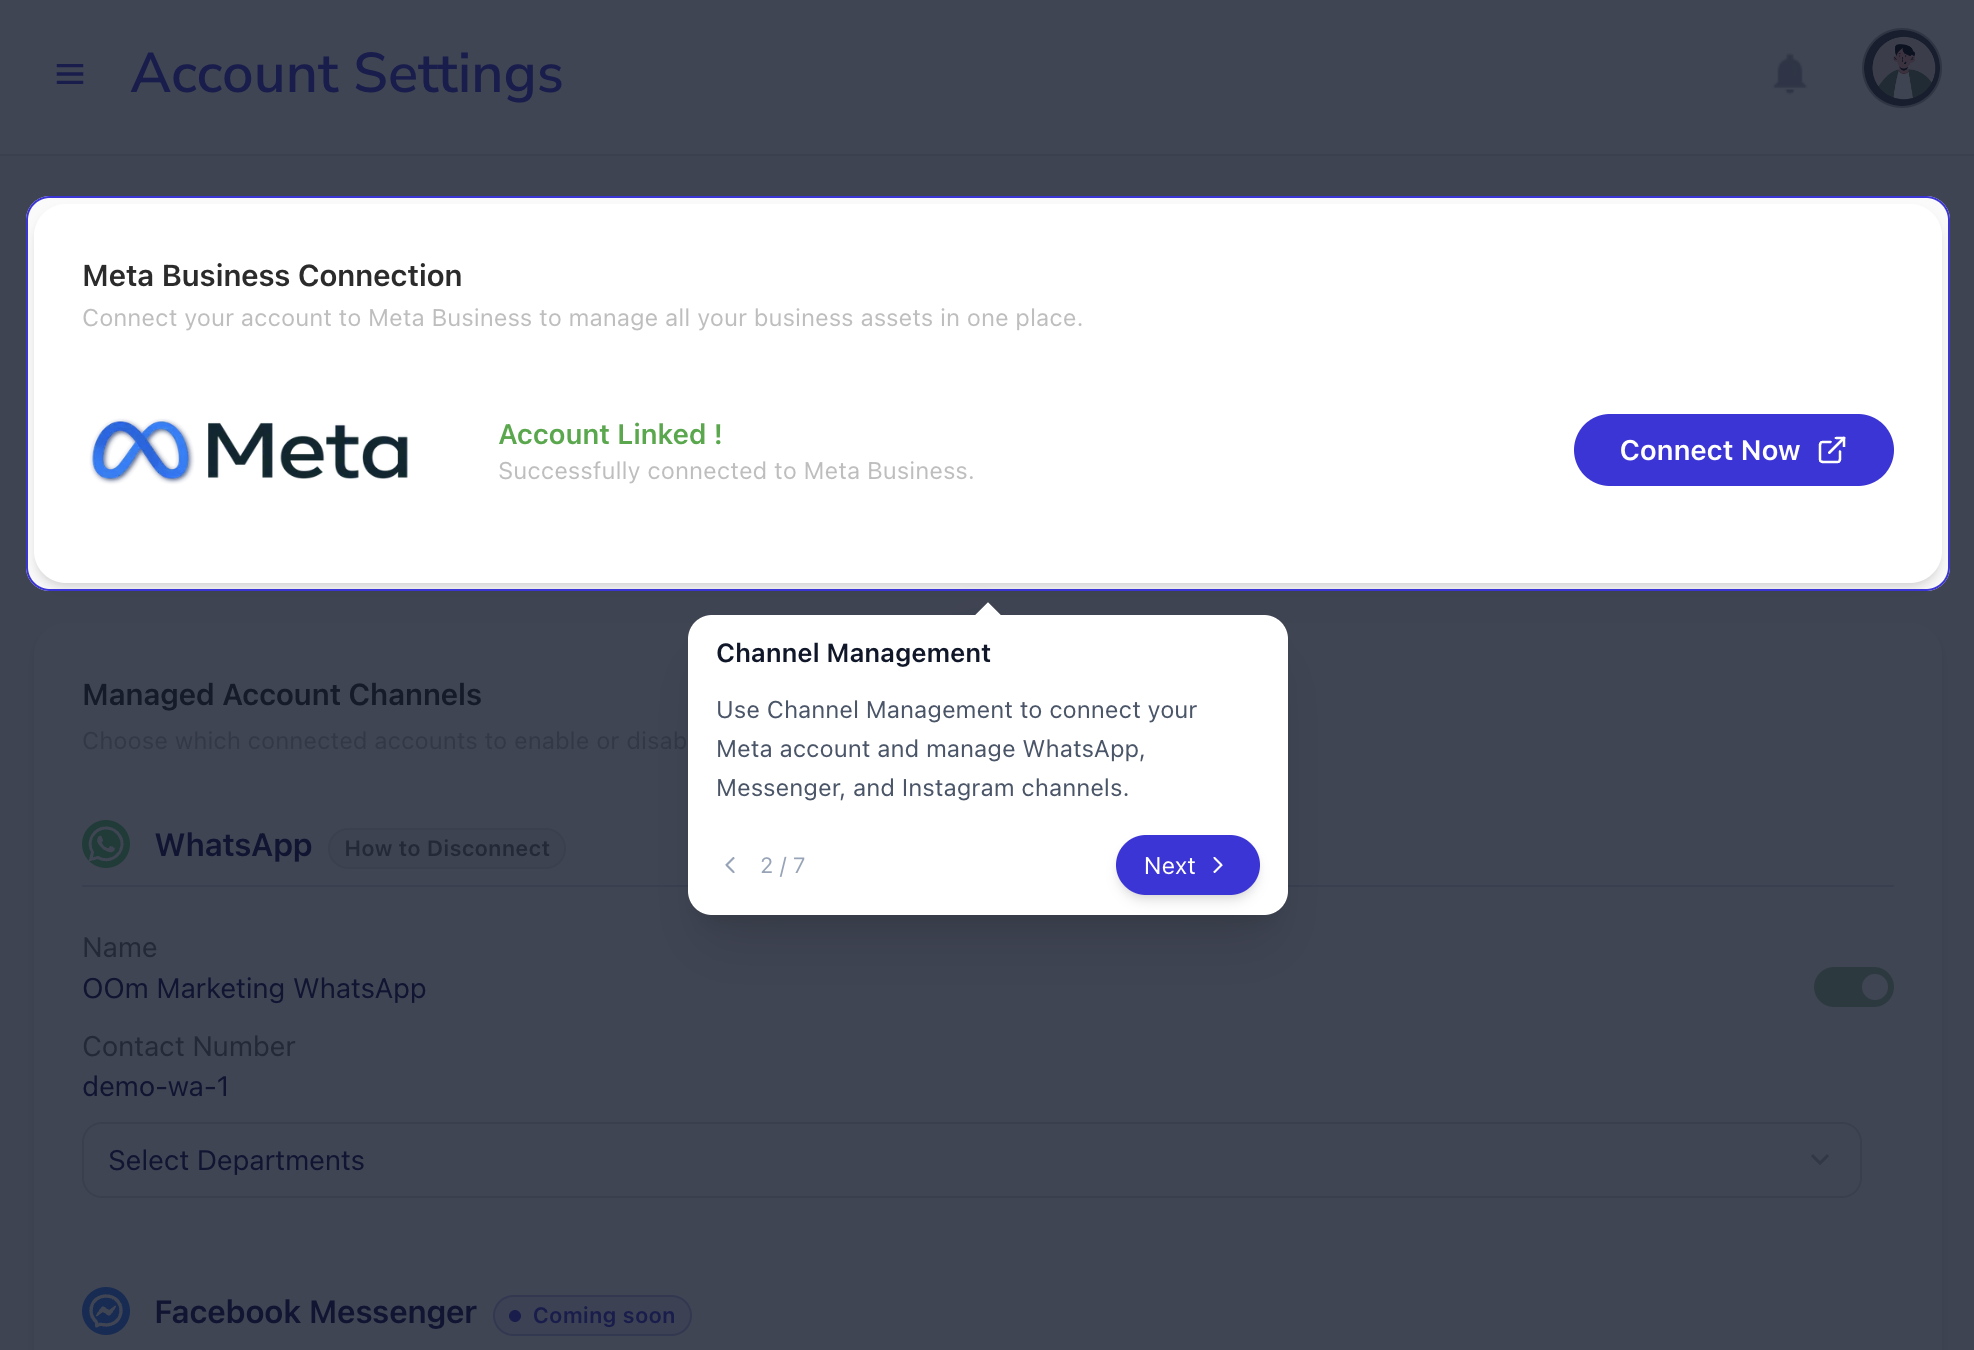
The Channel Management interface where our client connects Meta and activates their WhatsApp numbers.
Step 2: Customize the Widget
After activating the number, you can customize how the widget appears to our client's website visitors.
- Go to the WhatsApp Widget tab in Account Settings.
- Select the client's WhatsApp Number from the dropdown menu.
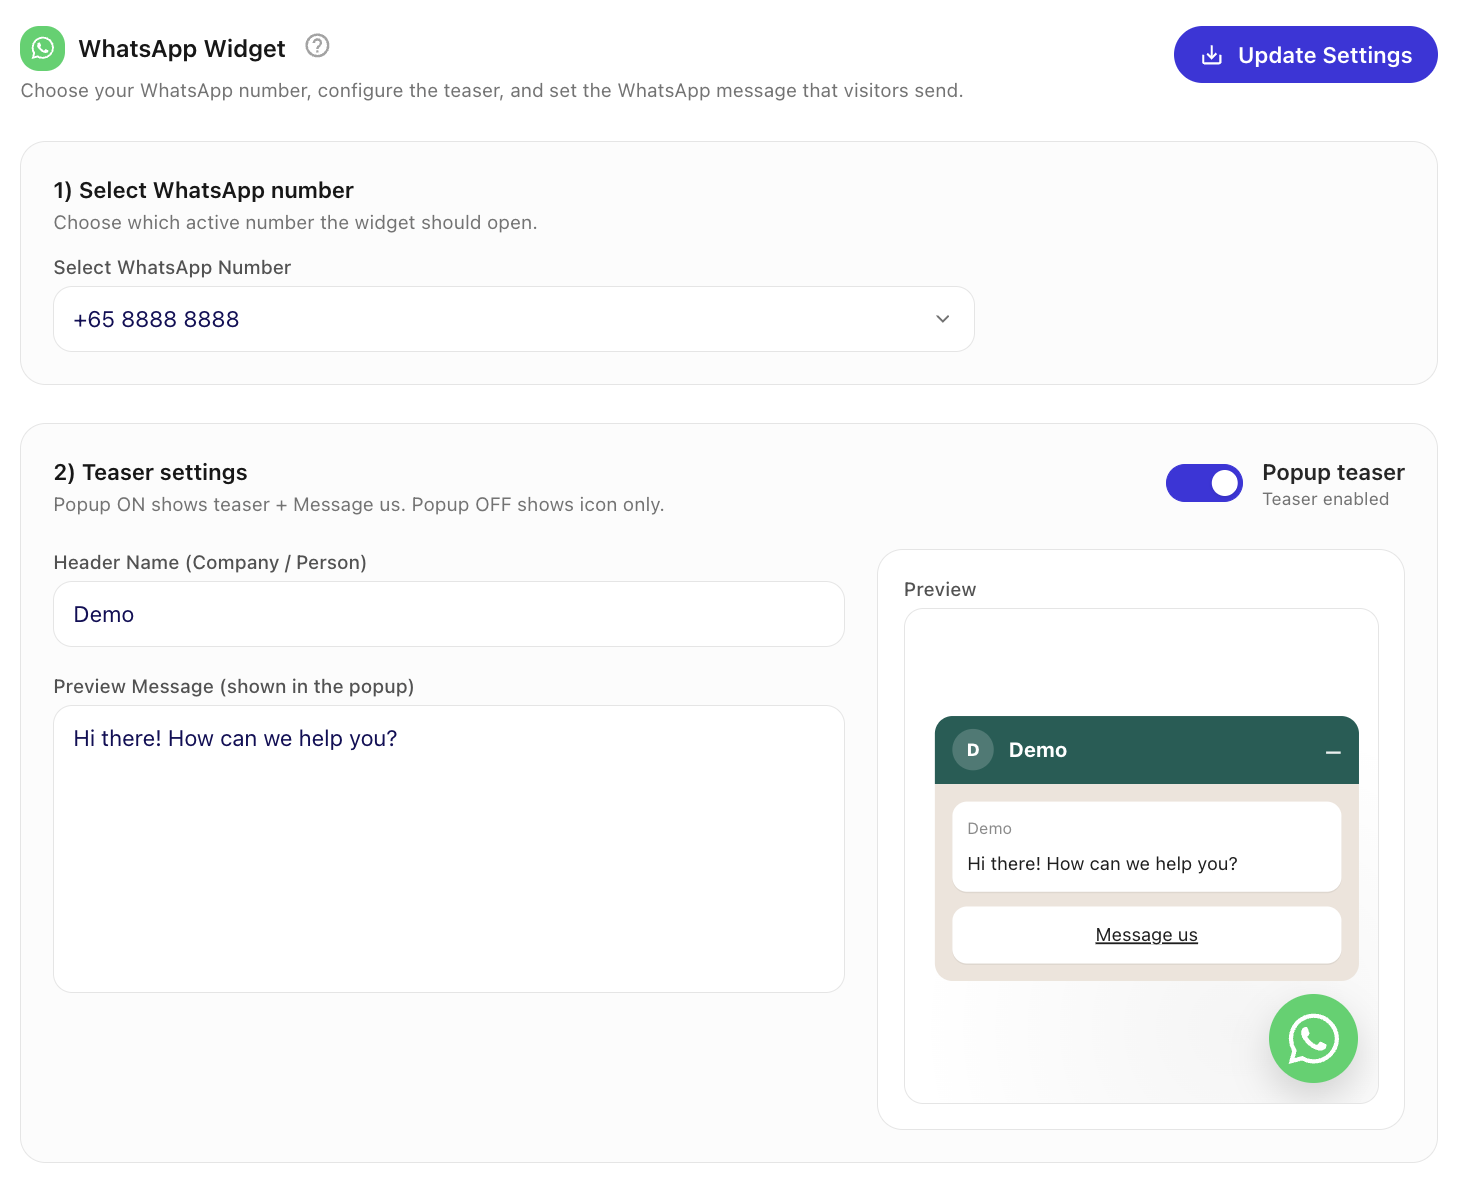
Select the active number to begin configuring the widget's appearance and behavior.
- Configure the Teaser Settings:
- Popup teaser (ON): Displays a header name, a preview message, and a "Message us" button.
- Popup teaser (OFF): Displays only the floating WhatsApp icon.
- Header Name: Enter the company or department name.
- Preview Message: Write a short greeting to encourage visitors to chat.
- WhatsApp Pre-filled Message: Define the message that will be automatically typed for the visitor when they open WhatsApp.
- Click Save Settings to finalize the configuration.
Step 3: Technical Installation
The final step is to embed the widget script into our client's website.
- Scroll to the Installation section at the bottom of the page.
- Copy the generated Script Snippet.
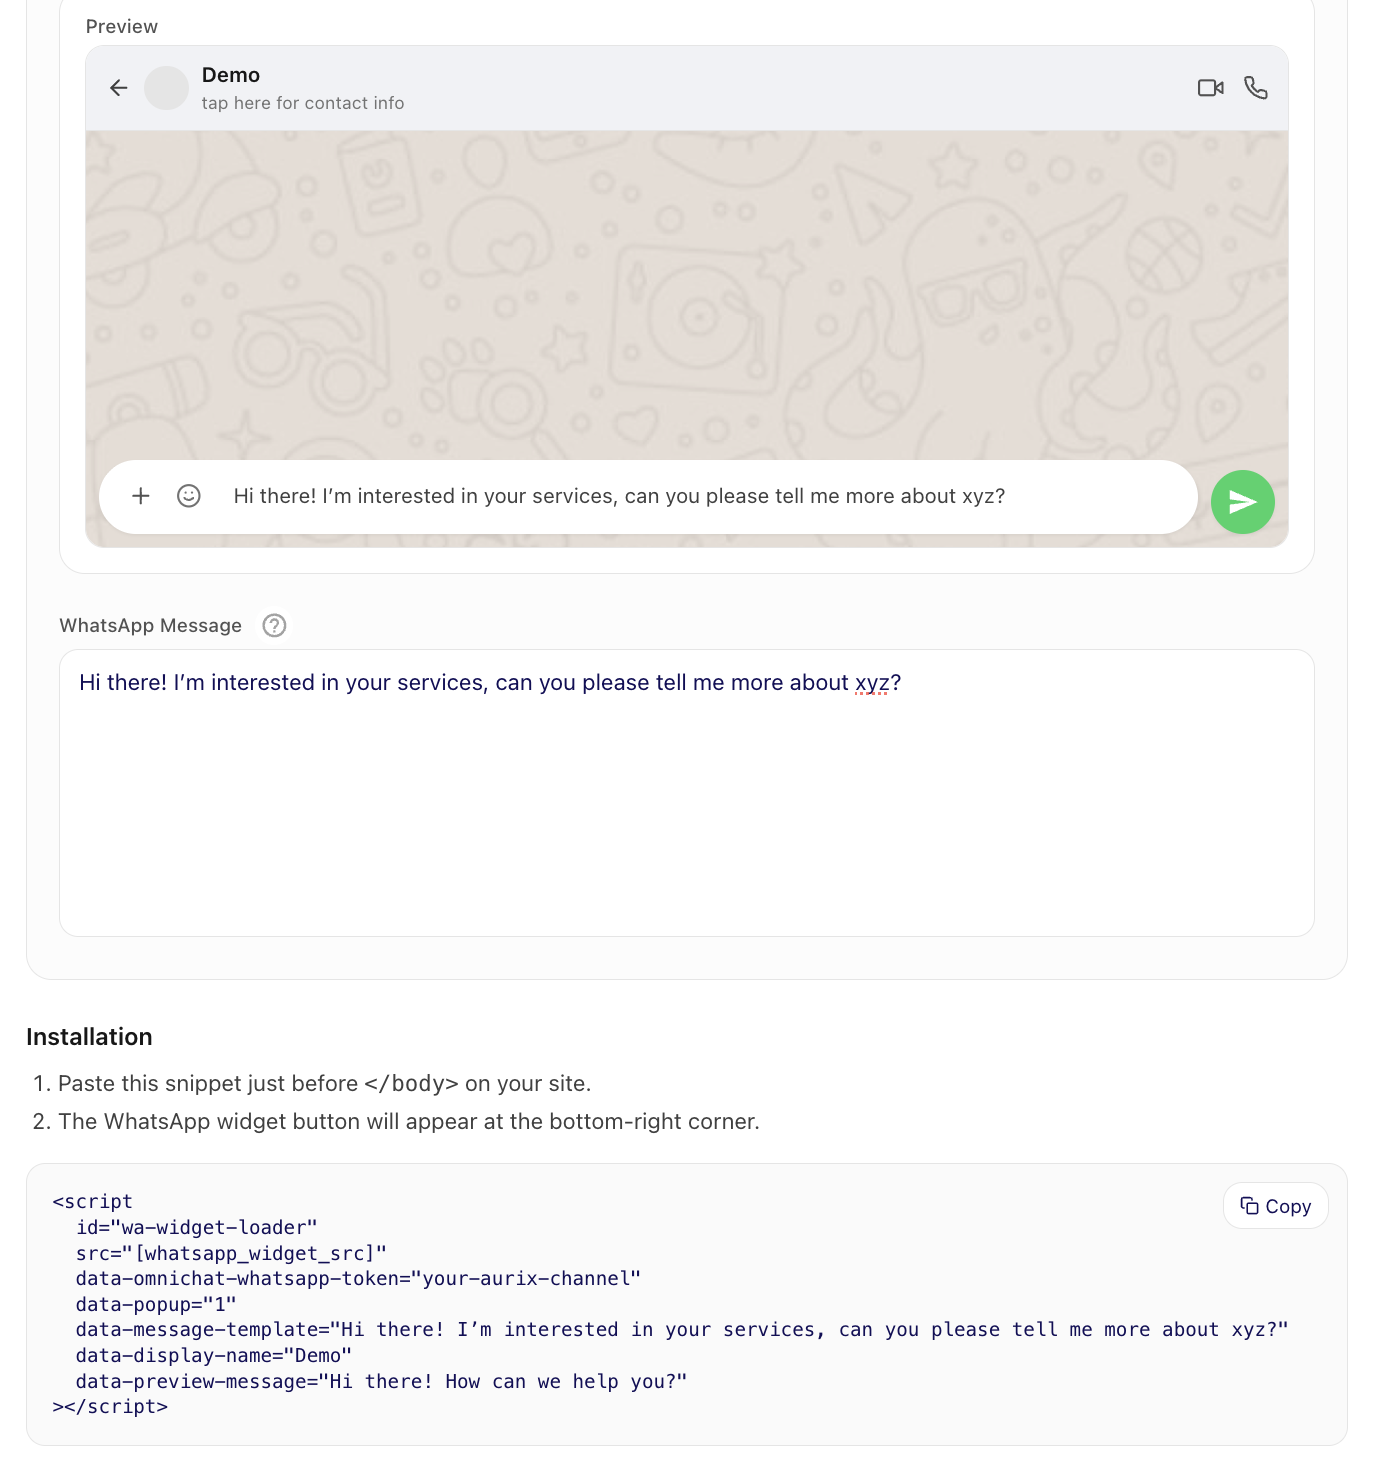
Copy the unique script snippet from the Installation section.
- Paste the snippet just before the closing
</body>tag on every page where the widget should appear.
Platform-Specific Guides
Different platforms (Shopify, WordPress, etc.) have different methods for inserting custom scripts. The key is to inject the snippet into the correct location.
Consulting the Developer
If the integration does not work as expected, consult the website developer. Show them the script snippet and ask them where it should be injected for the specific platform. They just need to ensure the script is loaded and the data attributes are correctly preserved.
Paste the script at the end of your HTML file:
<body>
  <!-- Your content -->
  <script
    id="wa-widget-loader"
    src="[whatsapp_widget_src]"
    data-omnichat-whatsapp-token="YOUR_TOKEN"
    data-popup="1"
    data-message-template="Hello! I have a question."
    data-display-name="Support Team"
    data-preview-message="How can we help you today?"
  ></script>
</body>
Incorporate the widget using the next/script component in your layout.tsx or _app.js:
import Script from 'next/script'

export default function RootLayout({ children }) {
  return (
    <html lang="en">
      <body>
        {children}
        <Script
          id="wa-widget-loader"
          src="[whatsapp_widget_src]"
          data-omnichat-whatsapp-token="YOUR_TOKEN" // (1)!
          data-popup="1"
          data-message-template="Hello! I have a question."
          data-display-name="Support Team"
          data-preview-message="How can we help you today?"
          strategy="afterInteractive"
        />
      </body>
    </html>
  )
}
 Replace
 YOUR_TOKENwith the unique token generated in your dashboard.
Troubleshooting
The widget isn't appearing on our client's site
- Ensure the WhatsApp number is active in Channel Management.
- Verify that the script is placed correctly before the
</body>tag of the site. - Check the browser console for any loading errors (Right-click > Inspect > Console).
- Ensure the
data-omnichat-whatsapp-tokenmatches the one in the dashboard exactly.
Dashboard settings were updated, but the widget hasn't changed
- Caching: The browser or website may be caching an older version of the script. Try clearing the browser cache or viewing the site in an Incognito/Private window.
- Saving: Ensure Update/Save Settings was clicked in the dashboard after making changes.
- Number Change: If switching to a different WhatsApp number, you must copy the new script snippet and update it on the website, as the token is unique to each number.
The widget overlaps with other elements on the site
- The widget is positioned at the bottom-right by default. If it overlaps with other site elements (like "Back to Top" buttons), the website developer may need to adjust the CSS positioning of either the widget or the conflicting element.
Console error: 'Refused to load the script because it violates Content Security Policy'
- The website may have a Content Security Policy (CSP) that blocks external scripts. The developer will need to add the
srcroot url to thescript-srcdirective of the CSP.
Can I use multiple numbers on one site?
Currently, the widget is designed to use one primary WhatsApp number per installation. To change numbers, update the settings in your dashboard and the widget will reflect the changes automatically; you will need to copy the new configuration and repeat the installation steps again.